Before proceeding please ensure you have installed your Edelbrock
Performer Series Carburetor according to the Carburetor Installation
Instructions included with the carburetor
The Edelbrock Performer Series Carburetor is designed to allow quick
and easy changes to the metering. Virtually any change imaginable can
be performed without removing the carburetor from the manifold, and
the most common changes may be performed in less than five minutes
without removal of the airhorn (bowl cover).
To help you calibrate your carburetor, a CALIBRATION REFERENCE
CHART has been designed for each model of the Edelbrock Performer
Series carburetor. These charts each consist of two
sections: A Calibration Table and a Rod/Jet Reference Chart.
After reading the Calibration procedures, the next step in
calibrating your carburetor is to look at the Calibration Table for
your model carburetor. Determine if you would like to go richer or
leaner in the Cruise Mode and do the same for the Power Mode. Select
the number that is closest to intersection of your Cruise and Power
Mode selections. This is your calibration reference number. Now refer
to the Rod/Jet Reference Chart that appears on the opposing page.
Locate your calibration reference number to determine the rod/jet
combination for your application.
For example, you have a 1405 Edelbrock Performer Series carburetor.
You have determined (by reading the rest of the manual) you would like
to go 1 stage lean in the Cruise Mode and 2 stages lean in the Power
Mode. The intersection of these two lines lies on the number 21. This
is your calibration reference number. Now look below the Calibration
Table to the Rod/Jet Reference Chart. Find the number 21 under the
REF# column. The jets you should use are .098 and the rods are .070 x
.052.
Located at the very bottom of each Calibration Reference Chart is a
guide for changing your Secondary Metering. This will be useful when
calibrating the wide-open-throttle (WOT).
Before you attempt to establish a new calibration, be sure that the
engine is in a sound state of tune. All ignition items must be in
proper working order, including reasonably fresh plugs of the correct
heat range. Timing should be properly set and the air filter element
and fuel filter should be clean.
Proper fuel pressure should be verified and cracked or brittle
vacuum lines should be eliminated. Many so-called "carburetor
calibration" problems have been traced to another part of the
engine system that was not functioning properly.
CAUTION: Be alert to carburetor flooding when fuel is first
applied. Flooding can be caused by dirt, small particles of hose
cuttings, floats and inlet needles which have settled during shipping,
or by other conditions as discussed below. Each Edelbrock Performer
Series carburetor is flow tested in the factory for both air and
liquid flow so flooding is rare. However, for safety sake please
observe this caution. When the fuel pump is turned on or when the
engine is first started, watch closely for signs of flooding. If
flooding is apparent, tap the body of the carburetor lightly with a
rawhide mallet or the wooden handle of a small hammer. If flooding
continues, pinch the fuel line hose to shut off flow, run the engine
to clear the carburetor, and let the fuel line flow again. If flooding
continues, pinch the fuel line hose to shut off flow, run the engine
to clear the carburetor, and let the fuel line flow again. If flooding
still continues, stop the engine. Clean up any raw gasoline and refer
to the "Trouble Shooting" section of the Owner's Manual.
Parts and Equipment
Aside from ordinary hand tools, the following items are
recommended.
Edelbrock Performer Series Carburetor Jet Set - Contains selections
of Main Jets, Metering Rods, and Springs.
-
Tachometer - If the vehicle is not equipped with a tach, the
dwell meter style tach will be adequate. If neither is available,
you will be able to use the speedometer in place of the tach for
some of the procedures, but it will not be as convenient.
-
Vacuum Gauge - Should be hooked up to read engine's intake
manifold vacuum. Without a vacuum gauge, some of the calibration
procedures will be more difficult.
Changing Components
Metering Rod and Step-Up Spring changes can typically be made
in less than five minutes and without removing the carburetor.
First, loosen the Step-Up Piston Cover Screws (See pg. 30) and
twist the Step-Up Piston Cover Plates to the side. The Metering
Rods and Step-Up Springs can now be removed and replaced if
necessary. Be sure to replace the Step-Up Piston Cover Plate and
tighten the Step-Up Piston Cover Screw when finished.
CAUTION: Do not overtighten the Step-Up Piston Cover Screws!
They should only be tightened to 12 to 17 inch/pounds.
Excessive torque will weaken or snap off the screw heads. If this
happens, they may fall into the carb causing serious engine
damage. If an inch/pound torque wrench is not available, snug the
screw until it just touches the plate, then tighten 1/16th turn
more.
To replace the Primary or Secondary Metering Jets, first,
remove the Metering Rods and Step-Up Springs as outlined in the
preceding paragraph. Next, disconnect the Choke Cam Connector Rod,
Pump Connector Rod, and Choke Connector Rod (when applicable).
Finally, remove the 9 Airhorn Attaching Screws and remove the
Airhorn from the carburetor body. A standard screwdriver can now
be used to remove the appropriate Metering Jets. Once desired
Metering Jets have been installed the carb may be reassembled by
reversing this procedure.
The Edelbrock Performer Series carburetor has conventional Idle
Mixture Screws (IMS) that provide a leaner A/F when turned clockwise
and richer A/F when turned counter clockwise. The idle air flow is
controlled by a conventional screw that opens the Primary Throttles.
The following procedure should be used to set the idle mixture and
speeds.
1. Fully warm engine and ensure choke is fully open.
2. Air cleaner in place.
3. Set desired speed with the air screw.
4. Adjust the IMS on ONE side to get the maximum possible RPM. Do
not go rich beyond the maximum speed point.
5. If the above changed the idle speed more than 40 RPM, then
readjust the speed.
6. Adjust the side OPPOSITE of that in Step 4 to get maximum RPM.
7. Reset the speed.
8. Carefully trim each IMS to again get the maximum idle RPM.
9. Go leaner just enough to get a 20 RPM drop in speed.
10. Reset the speed to the desired RPM.
11. This is a Lean-Best Idle Set. Setting richer than this will not
improve idle quality or performance, but could tend to foul plugs.
Winter Fuel Idle Sets
During the winter months (in most parts of the country) the local
fuel will be a "winter" blend that is very volatile, as an
assist to cold-engine starting and driveability during warm-up.
However, the high volatility has the disadvantage of allowing
excessive vaporization of the fuel if the vehicle is operated in a
heated area such as a garage. This can result in problems in the
idle-set procedures since the carburetor's internal vents will allow
this excess vapor to be drawn into the throats and enrichen the
mixture. The idle will be erratic and not seem to be able to hold a
set. To resolve this type of problem, it is advisable to perform the
final settings outdoors after the vehicle has been stabilized with a
drive of several miles.
Long Duration Camshaft
If the engine has a fairly radical camshaft it may require an
excessive amount of throttle opening for idle and/or have low idle
vacuum levels. Either condition can lead to poor levels of
adjustability and erratic idles.
Another fix for the above condition is to run as much spark advance
as possible at idle. If the distributor is fitted with a vacuum
advance unit, connect it directly to manifold vacuum. If you are not
able to employ vacuum advance for some reason, then the mechanical
curve should have a low limit, which will allow you to use plenty of
initial spark advance.
Measure the manifold vacuum at idle. If it is below 7" Hg,
there is a good chance that the Metering Rods are in the up (rich)
position. When combined with a high idle air rate this can cause
the Nozzles to discharge fuel at idle. Use a weaker Step-Up Spring
(see section on Step-Up calibration) to keep the Rods down at
idle. With some cams, a stiffer spring (pink or silver) is
necessary. Experimentation is the best way to determine which is
best for your application.
The best place to perform your WOT calibration is on a chassis dyno.
If one is not available then consider a safe, legal driving space,
such as a drag strip where you are given E.T. and MPH data.
1. Select an RPM Range to use in evaluating the WOT power. As a
rule, use the highest 50 percent of the real power band. If your
engine makes good power up to 5000 RPM, then 2500-5000 is a good
range. If peak power is at 6500, then 3500-6500 would be a good pick.
Be sure not to select RPMs that are higher than the engine's useful
power band.
2. Accelerate at WOT from 1000 RPM below the range you have elected
to a few
hundred over the range. Time the acceleration with a stop-watch. Be
sure to time only the interval while the engine is sweeping through
the selected range. Make enough timed accelerations to get a good
average that is not affected by wind or grade.
3. Refer to the Calibration Reference Chart for your model. Find
the richest Power Mode (Primary Metering) change you can make without
changing a Jet -- a Rod change only. This will probably be 2 stages
(8%) rich.
4. Change to the indicated Rods. Perform timed acceleration #2.
Compare the times. Do not be surprised if there is no difference.
5. Compare the results of timed acceleration #2 to the base
calibration and refer to the following section that best describes
your situation:
Case 1: Faster than base calibration
-
Change Secondaries 2 stages richer and perform acceleration test
#3.
-
If test #3 is the same as #2, you're done.
-
If test #3 is slower than #2, change to 1 stage rich for the
Primary and Secondary and you're done.
-
If test #3 is still faster than #2, go to 3 stages rich Primary
and Secondary and keep going richer until there is no change (or
slower) in the times. Stay at the first "no change"
level, so that you stay with the richer of any two levels of
calibration that have the same power.
Case 2: Slower than base calibration
Go to 1 stage lean Primaries and 1 lean Secondaries and perform
acceleration test #3.
-
If test #3 is the same as base calibration, go back to the base
calibration.
-
If test #3 is faster than base calibration, go to 2 stages lean
on both the Primaries and the Secondaries. Keep going in the lean
direction until there is no change or slower then back up 1 stage
richer, so that you stay with the richer of any two levels of
calibration that have the same power.
Case 3: Same as base calibration
Do not be surprised. Change back to base calibration.
The Metering Rod feature used in the Edelbrock Performer allows easy
calibration of the part-throttle without change to the WOT metering.
Cruise Mode: The power output is low, as in a steady cruise light
acceleration. Manifold Vacuum is high and the Metering Rods are down
in the lean position.
Power Mode: The power output is high, as in a heavy but not
wide-open acceleration. Manifold Vacuum is low and the Rods are up
in the rich position.
As explained in the "Theory of Operation," the
Step-Up function modulates the Rods between the Cruise and Power
positions.
The part-throttle calibration is more
"individualized" than is the Wide-Open-Throttle (WOT).
It is not measured by absolute numbers, but reflects the driver's
feel for a particular combination.
Carefully evaluate the driveability with the carburetor at the
calibration level determined from the WOT exercise. Drive at a
variety of engine speeds and throttle openings looking for any
flat spots or lean/surge conditions.
Cruise Mode
If there are any surge or flat spot conditions in the steady
speed cruises or light accelerations, a lean condition probably
exists. Consult the Calibration Reference Chart and change to 1
stage rich in the Cruise Mode. If it gets better, but not
completely fixed, keep going in the rich direction. The
Calibration Reference Chart will give you Rod and Jet combinations
that are directionally correct or you may choose your own.
If the light throttle is satisfactory, trying going 1 stage
lean in the Cruise Mode. If there are still no problems with surge
or other indications of lean metering, do not hesitate to go to 2
stages lean in the Cruise Mode. A lean Cruise Mode has advantages
in fuel economy and keeping the plugs clean. Keep going until you
begin to notice driveability problems and then back up 1 stage.
Power Mode
Accelerations at part-throttle with low manifold vacuum (less
than about 5" Hg on a vacuum gauge) are metered by the Power
Mode. Avoid calibrating this portion of the engine's
operating range too lean as spark knock (detonation) and
piston/valve burning can occur. If this mode has any lean
driveability symptoms (surge or flat spots), it is too lean and
should be recalibrated at least 1 stage richer.
The Step-Up function, which moves the Metering Rod to the Power
Mode, is controlled by the Step-Up Spring. The base calibration has a
spring which "stages" rich at 5" Hg.
If your vehicle has a mid-throttle driveability problem that is
encountered as the throttle is gradually opened, but then goes away
upon further opening, it may be possible to eliminate the lean spot by
using a stronger Step-Up Spring. The available Step-Up Springs are
listed in the following chart along with their respective
"staging" point. It is best to select a new spring on the
basis of vacuum readings, but in the absence of a gauge, try the
strongest spring
(highest vacuum rating) to see if the problem goes away. If the
drive problem is cured by the strong spring, try the next weakest
spring as well. If the strong one does not help, then the calibration
problem is related to the A/F metering stage of either the Cruise or
Power Modes. Use the Calibration Reference Chart to help select
another combination.
|
Spring Color
|
Blue
|
Yellow
|
Orange
|
Pink
|
Plain
|
|
Staging Vacuum ("Hg)
|
3"
|
4"
|
5"
|
7"
|
8"
|
A complete set of these springs is available separately as
Edelbrock part #1464.
If you encounter any hesitations or stumbles that do not seem to be
related to the basic metering or have not responded to changes in the
basic metering, move the pump drive link to one of the holes closer to
the carburetor body. This will increase the stroke length of the
plunger and result in more pump delivery.
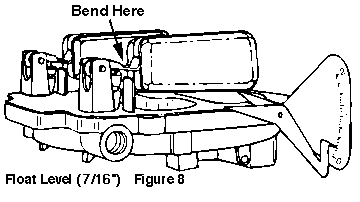
To properly adjust the floats in the EPS carburetor, two procedures
must be followed. First, invert the airhorn cover (Figure 8) holding
the airhorn gasket in place. There should be 7/16" between the
airhorn gasket and the top of the outer end of the float. To adjust
the float level, bend the float lever until the recommended level is
attained. DO NOT press the needle into the seat when adjusting the
float lever. Next, you should check the float drop (Figure 9).

Hold the airhorn upright and let the floats hang down. There should be
1-1/4" ± 1/4" between the airhorn gasket and the top of the
outer end of the float. To adjust the float drop, bend the tab on the
back until the recommended float drop is attained.
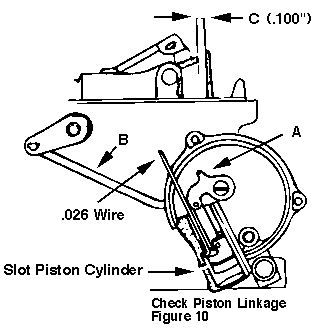
To adjust the choke piston linkage (Figure 10) open the choke valve
and insert a .026" wire, with a 90 degree bend 1/8" from the
end, between the top of the slot in the choke piston cylinder and the
bottom of the slot in the piston. Hold the wire in position and close
the choke valve by pressing on piston lever A until resistance is
felt. The dimension C should be .100" between the top edge of the
choke valve and the air horn. To adjust, bend rod B.
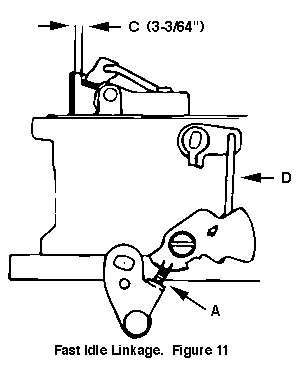
To adjust the fast idle linkage (Figure 11) place the fast idle screw
A between the two notches on the cam. Close the choke valve as far as
possible without forcing it. The dimension C should be 3/64"
between the choke valve and the air horn. To adjust bend rod D.
Fast idle may be adjusted to manufacturers specifications (usually
1500 rpm) during normal choke cold operation. The fast idle screw A
can be adjusted with engine off and throttle held open to allow screw
head access. Recheck fast idle speed after each adjustment.
The length of time during which the choke will stay closed is
determined by the position of the choke cap. As the choke cap is
turned clockwise the choke will stay closed longer. To properly set
the choke turn the choke cap to the leanest notch on the choke
housing, tighten the choke housing retaining screws, and run the
engine until normal operating temperature is reached. With the engine
running, slowly turn the choke cap clockwise until the choke valve
begins to close. Now turn the choke housing one notch counterclockwise
(LEAN) and tighten the choke housing retaining screws. Periodic
readjustment of the choke will be required as the temperature changes
throughout the year. After each adjustment verify that the choke valve
opens fully after the engine is warm.
The preceding calibrations and adjustments apply to carburetors used
in general street applications. In the following extreme instances,
special calibration procedures may need to be followed.
Off-Road
Although the Edelbrock Performer Series carburetor was not
calibrated with hill climbing and other extreme off-road operation in
mind, it can be made to perform superbly by substituting Edelbrock
#1465 spring loaded needle and seat for the original needle and seat.
The spring loaded needle and seat act like a shock absorber, reducing
the possibility of flooding during off-road operation. After
installation of the new needle and seat you must reset the float level
to 3/8" and drop the float drop to 1-1/4" as outlined in
"FLOAT ADJUSTMENT".
High Fuel Flow
When evidence of fuel starvation exists, first ensure that proper
pressure (4-5 psi minimum) is maintained at WOT. If proper fuel
pressure is supplied and fuel starvation still exists, it may be
necessary to change the needle and seat to a larger size (#1466). Do
not make this change unless absolutely required, as the smaller inlet
is preferred for proper fuel control under most conditions.
High Altitude
Altitude has a direct effect on the operation of most carburetors.
As the altitude increases, the air becomes less dense so a carburetor,
originally calibrated at low altitude, delivers too much fuel and the
engine runs richer. If the preceding tuning procedure is performed on
an Edelbrock Performer Series carburetor, a proper high altitude
calibration will result. If the vehicle was calibrated at lower
altitude, however, and is to be driven at high altitude temporarily,
it is not necessary to repeat the complete calibration procedure.
Instead, use the rule of: "2% leaner per 1500 feet" and the
Calibration Reference Chart for your model carburetor. For example,
with a #1405 at baseline calibration (location #1 on the chart) and
intended operation at 6000 ft. altitude, you would want 6000 divided
by 1500 x 2% = 8% leaner calibration. That would be location #24 on
the chart which would require only a rod and jet change.
|
Carburetor Part No.
|
CFM
|
Main Jet Primary
|
Main Jet Secondary
|
Metering Rod
(Primary Only)
|
Step-Up Spring
|
Needle & Seat
|
Float Height
|
|
1404
|
500
|
.086"
|
.095"
|
.065" x .052"
|
orange (5")
|
.0935"
|
7/16"
|
|
1405
|
600
|
.100"
|
.095"
|
.070" x .047"
|
orange (5")
|
.0935"
|
7/16"
|
|
1406
|
600
|
.098"
|
.095"
|
.075" x .047"
|
yellow (4")
|
.0935"
|
7/16"
|
|
1407
|
750
|
.113"
|
.107"
|
.071" x .047"
|
orange (5")
|
.0935"
|
7/16"
|
|
1409*
|
600
|
.098"
|
.101"
|
.068" x .047"
|
orange (5")
|
.0935"
|
7/16"
|
|
1410*
|
750
|
.113"
|
.107"
|
.071" x .047"
|
orange (5")
|
.0935"
|
7/16"
|
|
1411
|
750
|
.110"
|
.107"
|
.075" x .047"
|
orange (5")
|
.0935"
|
7/16"
|
* = Carburetor is certified to meet U.S. Coast Guard Requirements.
Blended Fuels
Typically, two types of blended fuels are available: Gasohol and
gasahol. Gasohol is a blend of not more than 10% ethanol and gasoline.
As long as there is no more than 10% ethanol mixed with the gasoline
you carburetor will function properly. As the percentage of ethanol
climbs above10%, a richer A/F ratio will be required. Also, because
gasohol is more volatile than gasoline, hard hot starting and poor hot
weather driveability may result.
Gasahol can be a blend of either ethanol, methanol or other alcohol
with gasoline. Methanol blended fuel should not be used in your
Edelbrock Performer Series carburetor as it will cause corrosion of
the fuel system components. It can also cause rapid failure of seals,
gaskets, diaphragms and pump plungers.
Always check to see if you are using a blended fuel. Although the
pump may not indicate the fuel is blended, it is always advisable to
verify the type of fuel the station carries.
Blown Engines
Two model #1405 carburetors should be used on engines with positive
displacement superchargers, such as GMC 6-71 blowers or equivalent.
The following calibration changes make an excellent starting point:
Primary Jets - .101" (#1429); Secondary Jets - .101"
(#1429); Metering Rods - .070" x .042" (#1450); Step-up
Piston Springs - 5" (orange, stock); Needle & Seat assemblies
- .110" (#1466).
This calibration has been tested on engines ranging in size from
350 c.i.d. Chevys to 440 c.i.d. Chryslers with good results.
Carburetor Specifications (Continued)
|
Float Drop
(±1/4")
|
Pump Drive Link Location
|
Accelerator Pump Nozzle Diameter
|
Venturi Diameter Primaries
|
Venturi Diameter Secondaries
|
Throttle Bore Diameter Primaries
|
Throttle Bore Diameter Secondaries
|
|
1-1/4"
|
middle hole
|
.028"
|
1-3/16"
|
1-9/16"
|
1-7/16"
|
1-11/16"
|
|
1-1/4"
|
middle hole
|
.028"
|
1-3/16 "
|
1-9/16"
|
1-7/16"
|
1-11/16"
|
|
1-1/4"
|
middle hole
|
.028"
|
1-3/16 "
|
1-9/16"
|
1-7/16"
|
1-11/16"
|
|
1-1/4"
|
top hole
|
.035"
|
1-7/16 "
|
1-9/16"
|
1-11/16"
|
1-11/16"
|
|
1-1/4"
|
middle hole
|
.028"
|
1-3/16 "
|
1-9/16"
|
1-7/16"
|
1-11/16"
|
|
1-1/4"
|
top hole
|
.035"
|
1-7/16 "
|
1-9/16"
|
1-11/16"
|
1-11/16"
|
|
1-1/4"
|
top hole
|
.035"
|
1-7/16 "
|
1-9/16"
|
1-11/16"
|
1-11/16"
|
* = Carburetor is certified to meet U.S. Coast Guard Requirements.
Section
3 - Power Tuning
Top of page
|